Wednesday, November 14, 2007
Study Notes as at Nov 14, 2007
You can download these files from the links I will put up on this blogsite each time there is an updated file.
However, you will need WinRAR to unzip the files. You can download WinRAR from here:
http://www.rarlab.com/download.htm
My Study Notes as at Nov 14, 2007:
http://rapidshare.com/files/69562940/70526_StudyNotes.rar.html
Thursday, October 18, 2007
Once certified, how long is MCTS and MCPD valid?
MCTS:
The Technology Series certifications will expire when mainstream support for the version of the product ends.
MCPD:
The Professional Series certifications will require certification refresh every three years from the date of issue.
Sunday, October 14, 2007
How To Use Text Files as Database Storage

The MDI Child form entitled TestTextToDataSetForm shows a Tooltip button called Import Text Database. When you click on this, the program will read the file called:
C:\Users\Paul\Documents\test2.txt
and display it in the GridView Object.
There is also another button called Save which can save any changes made back to the TXT file.
Insert the child MDI form with the following objects in Document Explorer:
The red arrows above indicate the objects. Insert in this order:
- Dock statusStrip1 at bottom of TestTextToDataSetForm (“the Form”).
- Dock splitContainer1 in Fill mode docking.
- Set the splitContainer1 orientation to Horizontal.
- Reduce splitContainer1.Panel1 to minimum by dragging the separator up.
- Dock toolStrip1 in splitContainer1.Panel1.
- Insert Import Text Database Button (with Apple icon).
- Name it ImportTextDatabaseButton.
- Insert Save Button (Penguin Icon)
- Name it SaveButton.
Then insert event handler for the buttons:
using System;
using System.Collections.Generic;
using System.ComponentModel;
using System.Data;
using System.Drawing;
using System.Text;
using System.Windows.Forms;
using TestTextToDataSet;
using System.IO;
namespace DataBasePractice
{
public partial class TestTextToDataSetForm : Form
{
string path = @"C:\Users\Paul\Documents\test2.txt";
StringBuilder strDataItem = new StringBuilder();
DataSet ds;
public TestTextToDataSetForm()
{
InitializeComponent();
}
private void ImportTextDatabase_Click(object sender, EventArgs e)
{
ds = TextToDataSet.Convert(path, "MyNewTable", "\t");
dataGridView1.DataSource = ds.Tables[0];
dataGridView1.Update();
dataGridView1.Show();
toolStripStatusLabel1.Text = ds.Tables[0].Columns[0].ToString();
insertColumnNames2string();
}
private void insertColumnNames2string()
{
strDataItem.Remove(0, strDataItem.Length);
int numOfCols = ds.Tables[0].Columns.Count, count = 1;
foreach (DataColumn dataCol in ds.Tables[0].Columns)
{
strDataItem.Append(dataCol.ToString());
if (count < style="color: rgb(163, 21, 21);">"\t");
count++;
}
strDataItem.Append(Environment.NewLine);
}
private void Save_Click(object sender, EventArgs e)
{
int numOfCols = ds.Tables[0].Columns.Count, count = 1;
insertColumnNames2string();
StreamWriter sw;
foreach (DataRow theRow in ((DataTable)dataGridView1.DataSource).Rows)
{
foreach (DataColumn theColumn in
(DataTable)dataGridView1.DataSource).Columns)
{
strDataItem.Append(theRow[theColumn].ToString());
if (count < style="color: rgb(163, 21, 21);">"\t");
count++;
}
strDataItem.Append(Environment.NewLine);
count = 1;
}
sw = new StreamWriter(path);
sw.WriteLine(strDataItem);
sw.Close();
}
}
}
Thanks to Dave, the reference using TestTextToDataSet refers to this class below:
(http://www.codeproject.com/cs/database/DataSetFrmDelimTxt.asp?
df=100&forumid=38170&select=2270400&msg=2270400)
using System;
using System.Collections.Generic;
using System.Text;
using System.Data;
using System.IO;
namespace TestTextToDataSet
{
public class TextToDataSet
{
public TextToDataSet()
{ }
public static DataSet Convert(string File,
string TableName, string delimiter)
{
//The DataSet to Return
DataSet result = new DataSet();
//Open the file in a stream reader.
StreamReader s = new StreamReader(File);
//Split the first line into the columns
string[] columns = s.ReadLine().Split(delimiter.ToCharArray());
//Add the new DataTable to the RecordSet
result.Tables.Add(TableName);
//Cycle the colums, adding those that don't exist yet
//and sequencing the one that do.
foreach (string col in columns)
{
bool added = false;
string next = "";
int i = 0;
while (!added)
{
//Build the column name and remove any unwanted characters.
string columnname = col + next;
columnname = columnname.Replace("#", "");
columnname = columnname.Replace("'", "");
columnname = columnname.Replace("&", "");
//See if the column already exists
if (!result.Tables[TableName].Columns.Contains(columnname))
{
//if it doesn't then we add it here and mark it as added
result.Tables[TableName].Columns.Add(columnname);
added = true;
}
else
{
//if it did exist then we increment the sequencer and try again.
i++;
next = "_" + i.ToString();
}
}
}
//Read the rest of the data in the file.
string AllData = s.ReadToEnd();
//Split off each row at the Carriage Return/Line Feed
//Default line ending in most windows exports.
//You may have to edit this to match your particular file.
//This will work for Excel, Access, etc. default exports.
string[] rows = AllData.Split("\r\n".ToCharArray());
//Now add each row to the DataSet
foreach (string r in rows)
{
//Split the row at the delimiter.
string[] items = r.Split(delimiter.ToCharArray());
//Paul: Solves blank row import problem
if (r != "")
{
//Add the item
result.Tables[TableName].Rows.Add(items);
}
}
//Return the imported data.
return result;
}
}
}
Tuesday, October 9, 2007
How to Insert Data into Access Database Programmatically

Then, close the database. Open Visual Studio 2005 and create a new Data Source by clicking on the Data Menu then in the dropdown menuitem, select Add New Datasource... Navigate to the Access database that you created earlier MyAccessDatabase.mdb and add it.
To see the new database, click on the View Menu and select Server Explorer.
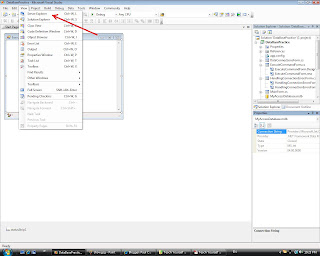
Then, select the database MyAccessDatabase from the Server Explorer. The connection string will be displayed in the Properties Grid on the bottom right.

Copy the Connection String. It looks something like this:
"Provider=Microsoft.Jet.OLEDB.4.0;Data Source="C:\Users\Paul\Documents\Visual Studio 2005\Projects\DataBasePractice\DataBasePractice\MyAccessDatabase.mdb"
Use the Connection String above in your code:
OleDbConnection accessConnection = new OleDbConnection(@"Provider=Microsoft.Jet.OLEDB.4.0;Data Source=C:\Users\Paul\Downloads\Downloaded MCTS\70-526\MyAccessDatabase\MyAccessDatabase.mdb");
private void createTableInAccessToolStripMenuItem_Click(object sender,EventArgs e)
{
OleDbCommand AccessCommand = new OleDbCommand();
AccessCommand.Connection = accessConnection;
AccessCommand.CommandType = CommandType.Text;
AccessCommand.CommandText =
//"CREATE TABLE MyTable ([ID][int] NOT NULL,[Name][nvarchar](10)NULL)";
"INSERT INTO MyTable(ID,MyName) VALUES ('1', 'Adrian')";
AccessCommand.Connection.Open();
AccessCommand.ExecuteNonQuery();
AccessCommand.Connection.Close();
}
Open MS Access to verify:

Note:
Note the commented out code (in green):
//"CREATE TABLE MyTable ([ID][int] NOT NULL,[Name][nvarchar](10)NULL)";
It will produce an error if executed for an MS Access Database. This is because the syntax for creating an Access Table is different from the syntax for creating an MS SQL 2005 Table. The command above is for SQL Table.
The Meaning of IDENTITY(1,1) in SQL Server
SqlCommand CreateTableCommand = new SqlCommand();
CreateTableCommand.Connection = NorthwindConnection;
CreateTableCommand.CommandType = CommandType.Text;
CreateTableCommand.CommandText =
"CREATE TABLE SalesPersons " +
"([SalesPersonID][int]IDENTITY(1,1)NOT NULL," +
"[FirstName][nvarchar](50) NULL," +
"[LastName][nvarchar](50) NULL)";
CreateTableCommand.Connection.Open();
CreateTableCommand.ExecuteNonQuery();
CreateTableCommand.Connection.Close();
Notice the SQL Command:
CREATE TABLE SalesPersons
(
[SalesPersonID][int]IDENTITY(1,1)NOT NULL,
[FirstName][nvarchar](50) NULL,
[LastName][nvarchar](50) NULL
)
What is the meaning of IDENTITY(1,1) ?
Answer:
It is the Property of the SalesPersonID. See figure below:
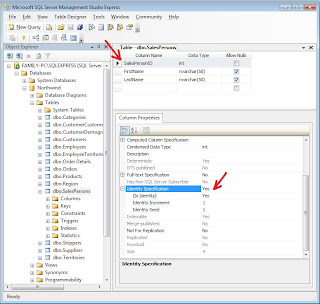
It sets the Property of SalesPersonID to be auto-incrementing (Identity Increment = 1) and also uniquely identifies the rows of this Table (Identity Seed = 1). These are the pre-requisite properties of a potential Primary Key.
Monday, October 8, 2007
How to Perform SQL Query from within Visual Studio 2005 Using Server Explorer
1. Click Server Explorer from the View Menu.
2. Click on the Northwind Database.
3. Click on the Data Menu and select New Query.
4. In the Add Table Dialog that appears, select the Table Tab then select CompanyName field.
5. The SQL Query is automatically created :
SELECT CompanyName FROM Customers
6. Right-Click on the SQL Query above. In the Context Menu that appears, click on :
! Execute SQL
7. The result will be immediately displayed below the SQL Command Box.
8. Alternatively, you can click on the Execute SQL icon in the Toolbar as shown in the red arrow below.
What is Inner Join?

The relationship between them is one-to-many as indicated by the red arrow. The Customer Primary Key is inserted into the Order Table as a CustomerID field. This implies that each Order can have only one Customer. On the other hand, each Customer can have more than one order. Hence, one-to-many.
In order to display a table which shows which customer ordered what item, we need to join the two tables in a meaningful way. A possible solution is the following SQL Query:
SELECT Customers.CustomerID, Customers.CompanyName, Orders.OrderID, Orders.OrderDate
FROM Customers INNER JOIN Orders
ON Customers.CustomerID = Orders.CustomerID
This will yield:

Notice this syntax:
FROM Customers INNER JOIN Orders
It reads as "Join the Customers Table to the Orders Table".
The next condition is:
ON Customers.CustomerID = Orders.CustomerID
It reads as "based on CustomerID". And we know that Customer ID from Customer Table is inserted into Order's Table as a field under the CustomerID field. This is what makes the Join possible.
Database File transferred from Vista to WinXP Problem - Solution
"...is compressed but does not reside in a read-only database or filegroup"
This means that the file is compressed because when it was created (in Vista), the Vista disk is a compressed Disk. But when I transfer it to WinXP, the disk is not a compressed disk.
Solution:
1. Right-click on the .mdf file
2. In the Context Menu that appears, select Properties
3. In the Properties Dialog that appears, click on the Advanced button
4. In the Advanced Attributes Dialog that appears, uncheck the Compress Contents To Save Disk Space checkbox. Then click OK.

5. Repeat the same thing for the .ldf file.
How to Attach an Existing Database to MS SQL Server 2005
1. Microsoft SQL Server 2005 Express
2. Microsoft SQL Server Management Studio Express
3. SQLSampleDb.msi file which contains the Pubs and Northwind mdf Database
All of the above can be downloaded for free from Microsoft from the following links:
Item 1 : http://www.microsoft.com/sql/editions/express/howtobuy.mspx
Item 2: http://www.microsoft.com/downloads/details.aspx?FamilyID=c243a5ae-4bd1-4e3d-94b8-5a0f62bf7796&DisplayLang=en
Item 3: http://www.microsoft.com/downloads/details.aspx?familyid=06616212-0356-46a0-8da2-eebc53a68034&displaylang=en
After installing everything, Item 3 (the Pubs and Northwind databases) will be located in C:\SQL Server 2000 Sample Databases
Fire up your MS SQL Server 2005 Management Studio. Login to SQL Server (no need password). Then to attach the Northwind database, do the following.
1. In the Object Explorer Tree View, expand the Databases Node.

2. Right-click the Databases Node. In the Context Menu that appears, select Attach...
3. In the Attach Databases Dialog that appears, Click on Add...

4. In the Locate Databases Dialog that appears, navigate to the folder C:\SQL Server 2000 Sample Databases. Select the NORTHWND.MDF file then click OK.
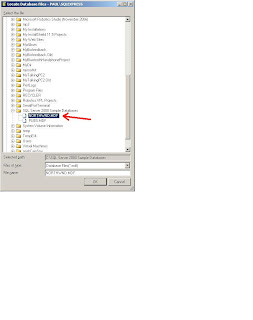
5. You wil now be able to see two new files in the Attach Databases Dialog, i.e. northwnd.mdf and northwnd.ldf.

5. Click OK. You will now be able to see the new Northwind Database Node as shown by the red arrow below.

6. Congratulations. You have successfully attached the Northwind Databases to MS SQL Server 2005 Express.
Sunday, October 7, 2007
How to Implement Many-to-Many Relationships
Many-to-many relationships let you relate each row in one table to many rows in another table, and vice versa. For example, you could create a many-to-many relationship between the authors table and the titles table to match each author to all of his or her books and to match each book to all of its authors. Creating a one-to-many relationship from either table would incorrectly indicate that every book can have only one author, or that every author can write only one book.
Many-to-many relationships between tables are accommodated in databases by means of junction tables. A junction table contains the primary key columns of the two tables you want to relate. You then create a relationship from the primary key columns of each of those two tables to the matching columns in the junction table. In the pubs database, the titleauthor table is a junction table.
To create a many-to-many relationship between tables:
1. In your database diagram, add the tables that you want to create a many-to-many relationship between.
2. Create a third table by right-clicking the diagram and choosing New Table from the shortcut menu. This will become the junction table.
3. In the Choose Name dialog box, change the system-assigned table name. For example, the junction table between the titles table and the authors table is now named titleauthors.
4. Copy the primary key columns from each of the other two tables to the junction table. You can add other columns to this table, just as you can to any other table.
5. In the junction table, set the primary key to include all the primary key columns from the other two tables.
6. Define a one-to-many relationship between each of the two primary tables and the junction table. The junction table should be at the "many" side of both of the relationships you create.
Another Example:
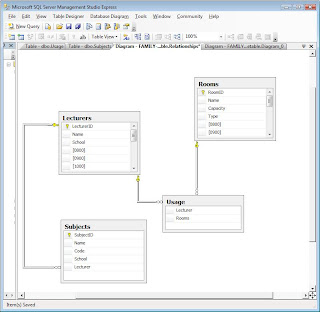
Below is an example where I am designing a database for a Classroom Time Table System. There are classrooms and there are lecturers who needed to be assigned to the classrooms. The relationship between Lecturers and Rooms is many-to-many. The solution is to create a Junction Table called Usage:
How to assign ownership to a newly-attached SQL Database
1. Create a new login:
Use MS SQL Server Management Studio and create a new login. Click on the Sercurity Node. Right-click on Login. In the Context Menu, click New Login... Add the new user.
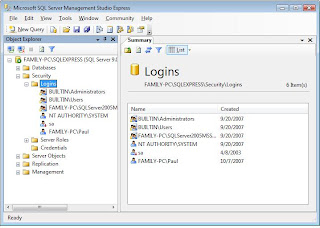
2. Assign the new user to the pubs database:
Expand the Databases Node. Right-click pubs database, then select Properties. In the database properties dialog, select Files. Besides the Owner Textbox, click on the ellipses... then select the newly created user from the ListBox.
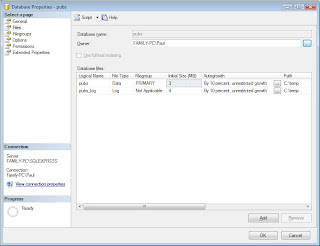
3. Alternative Solution
Alternatively, instead of adding a new user, you can use the existing sa user. This user is automatically created when installing MS SQL Server 2005. Assign ownership to sa also solves the problem.
Introduction
MCP -> MCTS -> MCPD
MCP = Microsoft Certified Professional
MCTS = Microsoft Certified Technology Specialist
MCPD = Microsoft Certified Professional Developer
The first exam is Exam 70-526 (Windows-Based Client Development).
Passing this first exam gets the MCP title.
Second exam will be Exam 70-536 (Application Development Foundation). Passing this second exam gets the MCTS title. This exam per se, does not carry MCP status, but 70-526 does. That is why 70-526 should be done first. Also, 70-526 is far easier than 70-536.
The last exam will be Exam 70-548 (Designing and Developing Windows-Based Applications Using the Microsoft .NET Framework). Passing this one, gets the MCPD title.

