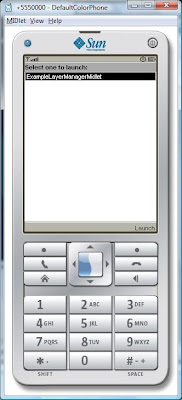
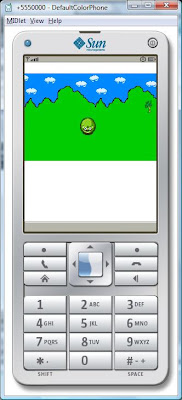
You can download Free Java Mobile Games and play it on Your PC here:
mobile9
If you have installed Netbeans 6.1 beta, there will be a Wireless Toolkit with the emulator.exe
program:
C:\Program Files\NetBeans 6.1 Beta\mobility8\WTK2.5.2\bin\emulator.exe
Create a folder called MyJar as follows:
C:\Program Files\NetBeans 6.1 Beta\mobility8\WTK2.5.2\bin\MyJar
Download any Java Mobile Jar and Jad files (eg games) into the MyJar folder.
Let's say MyGame.jad and MyGame.jar
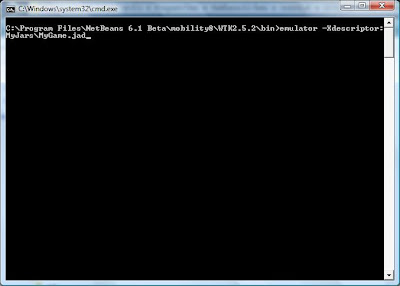
Goto command line and navigate to the folder:
C:\Program Files\NetBeans 6.1 Beta\mobility8\WTK2.5.2\bin
then type:
emulator -Xdescriptor:MyJars\MyGame.jad
Limitations:
Must have the .jad file, other wise emulator.exe won't run.
A better alternative:
Alternatively, and probably a much better alternative, use:
http://mpowerplayer.com/
it is a Java Webstart program. After download, just open the jar file on your PC.
Thursday, March 20, 2008
Wednesday, March 19, 2008
Monday, March 17, 2008
Saturday, March 15, 2008
Netbean's equivalent of Visual Studio's #region
Code Signing Blues
How to solve the Java Code Signing problem:
Java WebStart Code Signing
Setting Up SSL Certificates on Apache
How to setup your own Certification Authority
Singing Java Code with keytool
Java WebStart Code Signing
Setting Up SSL Certificates on Apache
How to setup your own Certification Authority
Singing Java Code with keytool
Friday, March 14, 2008
Testing java webstart on Apache on Windows
Download and install Apache for windows on Vista.
The document root is:
C:\Program Files\Apache Software Foundation\Apache2.2\htdocs
Edit this file:
C:\Program Files\Apache Software Foundation\Apache2.2\conf\mime.types
by inserting this line:
application/x-java-jnlp-file jnlp
Run the stop command as Administrator - right click on the stop icon. In the context menu, click on 'Run As Administrator'.
Then run the start command as Administrator.
Copy the entire contents of 'dist' from Netbeans into the 'htdocs' folder.
Fire up a browser and navigate to:
http://localhost/launch.html
Correct way to add icons to Java Applications for Web Start
The correct way to add icons to a Java Desktop Application that can also load the icon via Java Web Start is described below.
First, add the icon image kcalc.png to the resources folder as shown below:
Then, insert these two lines of code as shown below:
Frame frame = this.getFrame();
frame.setIconImage(frame.getToolkit().getImage(
getClass().getResource("resources/kcalc.png")));
Below is another alternative which is much clearer and much easier to understand:
Frame frame = this.getFrame();
Toolkit mytoolkit = frame.getToolkit();
Class myclass = this.getClass();
String iconpic = "resources/kcalc.png";
frame.setIconImage(mytoolkit.getImage(
myclass.getResource(iconpic)));
This way, the icon image kcalc.png will be packed as a single jar along with the main class and will be correctly delivered together via Java WebStart.
Thursday, March 13, 2008
How to Enable JFileChooser in Java Web Start
To enable JFileChooser to open the local HDD via Java Web Start, you will need to Self-Sign your Jar files:
To enable JFileChooser:
import javax.swing.JFileChooser;
public void openFile() {
JFileChooser fileChooser = new JFileChooser();
fileChooser.setFileSelectionMode(
JFileChooser.FILES_AND_DIRECTORIES );
int result = fileChooser.showOpenDialog( null );
}
Note that fileChooser.showOpenDialog( null );
param must be null because you need to open the dialogbox in a separate window like this:
Wednesday, March 12, 2008
Linux and Java Web Start and NetBeans 6
Netbeans 6 Beeper
The code below beeps and also updates the statusPanel:
import javax.swing.Timer;
private final Timer myTimer;
int i = 0;
myTimer = new Timer(1000, new ActionListener() {
public void actionPerformed(ActionEvent e) {
statusMessageLabel.setText(Integer.toString(i++));
Toolkit.getDefaultToolkit().beep();
}
});
import javax.swing.Timer;
private final Timer myTimer;
int i = 0;
myTimer = new Timer(1000, new ActionListener() {
public void actionPerformed(ActionEvent e) {
statusMessageLabel.setText(Integer.toString(i++));
Toolkit.getDefaultToolkit().beep();
}
});
Tuesday, March 11, 2008
How to change Application Icon and create Jar deployment using Netbeans 6
1. How to change application icon in Netbeans
Create a folder inside the main project folder. Call it 'lib'.
Put your icon in this 'lib' folder, eg, myicon.jpg. Make sure it is in the highest project directory.
For example, if your project is called Myapplication, then create the 'lib' directory inside Myapplication folder. Note that this 'lib' folder is not the same as the 'lib' folder in the 'dist'
directory described below.
Then, insert this code in red inside the FrameView.java code:
import java.awt.Toolkit;
public class DesktopApplication1View extends FrameView {
public DesktopApplication1View(SingleFrameApplication app) {
super(app);
Toolkit kit = Toolkit.getDefaultToolkit();
Image frameIcon = kit.getImage("lib\\myicon.jpg");
this.getFrame().setIconImage(frameIcon);
initComponents();
2. How to create jar deployment package
Then build your jar package. It will be in the 'dist' folder. It will contain the following:
mynewapplication.jar
lib
lib is a folder, it will contain all the dependency libraries. Next, copy the myicon.jpg icon into
this lib folder. This 'lib' folder is automatically generated and it is not the same 'lib' folder as the one we manually created above.
[Optional] Create a batch file called run.bat and put it inside the dist folder. the run.bat should have this line:
java -jar mynewapplication.jar
Now your dist folder contains 2 files and 1 folder:
1. run.bat
2. mynewapplication.jar
3. lib
The run.bat file is optional. Double clicking the jar file will also execute it. There is no need open a command line to call java -jar ...
To deploy your software, just zip the dist folder and distribute it.
Alternatively, use my ExeIntegrator 1.1 to create a standalone exe file.
Monday, March 10, 2008
Saturday, March 8, 2008
Java Remote DesktopCapture and Remote Control
http://www.indiwiz.com/products/dc/index.php
How It works
How to use java.awt.Robot
Opens notepad and enters text
Java.awt.Robot class is used to take the control of mouse and keyboard. Once you get the control, you can do any type of operation related to mouse and keyboard through your java code. This class is used generally for test automation.
This sample code will show the use of Robot class to handle the keyboard events. If you run this code and open a notepad then this code will write hi budy in the notepad.
import java.awt.AWTException;
import java.awt.Robot;
import java.awt.event.KeyEvent;
public class RobotExp {
public static void main(String[] args) {
try {
Robot robot = new Robot();
// Creates the delay of 5 sec so that you can open notepad before
// Robot start writting
robot.delay(5000);
robot.keyPress(KeyEvent.VK_H);
robot.keyPress(KeyEvent.VK_I);
robot.keyPress(KeyEvent.VK_SPACE);
robot.keyPress(KeyEvent.VK_B);
robot.keyPress(KeyEvent.VK_U);
robot.keyPress(KeyEvent.VK_D);
robot.keyPress(KeyEvent.VK_Y);
} catch (AWTException e) {
e.printStackTrace();
}
}
}
To capture Desktop
public void captureScreen(String fileName) throws Exception {
Dimension screenSize = Toolkit.getDefaultToolkit().getScreenSize();
BufferedImage image = new Robot().createScreenCapture(new Rectangle(screenSize));
ImageIO.write(image, "png", new File(fileName));
Alternatively, we might capture our JFrame, including its window decoration, as follows
public void captureFrame(JFrame frame, String fileName) throws Exception {
BufferedImage image = new Robot().createScreenCapture(frame.getBounds());
ImageIO.write(image, "png", new File(fileName));
}
Friday, March 7, 2008
Tuesday, March 4, 2008
Saturday, March 1, 2008
Software Protection or Software Destruction?
http://www.sofpro.com/
I downloaded the trial version PC Guard for Win32 from above link.
Tested it on Notepad.exe.
Notepad.exe totally failed to run.
Draw your own conclusions.
For me, I promptly deleted the downloaded PC Guard.
I downloaded the trial version PC Guard for Win32 from above link.
Tested it on Notepad.exe.
Notepad.exe totally failed to run.
Draw your own conclusions.
For me, I promptly deleted the downloaded PC Guard.
Subscribe to:
Posts (Atom)