Exercise page378
import java.lang.Exception;
public class MyException {
public static void main(String[] args) {
MyException ex = new MyException();
try {
ex.checkFood("Pizza");
} catch (BadFoodException bfe) {
System.out.println(bfe.getMyError());
}
}
private void checkFood(String food) throws BadFoodException {
if (food.equals("Pizza")) {
throw new BadFoodException();
}
}
}
class BadFoodException extends Exception {
public String getMyError(){
return "I don't like this food";
}
}
Saturday, January 31, 2009
Wednesday, January 28, 2009

Creating an exe for jar files

Use AutoIT and insert the following:
Run("javaw -jar pcSCJP.jar");
Select an appropriate icon and save it.
Then use the AutoIT Compile Script Tool, to convert it to an exe.
Put the exe in the same folder as the jar file.
Create a shortcut out of the exe file and put it anywhere you like, eg
the Desktop.
Double click the exe just like any windows program and it will launch
the jar file.
Monday, January 26, 2009
Monday, January 19, 2009
J2ME SMTP / POP3 - This Code Does Not Work
This code for sending and receiving emails as shown below taken from
http://www.experts-exchange.com/Networking/Wireless/Q_21094744.html
does not work. The reason is because you did not wait for server to
reply before sending the next command.
See my later blog for correct version.
public void sendEmail() {
try {
sc = (SocketConnection) Connector.open("socket://" + smtpServerAdress + ":25");
is = sc.openInputStream();
os = sc.openOutputStream();
sb = new StringBuffer();
// Send SMTP-Commands
os.write(("HELO" + domain + "\r\n").getBytes());
os.write(("MAIL FROM: "+ from_emailAdress +"\r\n").getBytes());
os.write(("RCPT TO: "+ to_emailAdress + "\r\n").getBytes());
os.write("DATA\r\n".getBytes());
os.write(("Date: " + new Date() + "\r\n").getBytes());
os.write(("From: "+ from_emailAdress +"\r\n").getBytes());
os.write(("To: "+ to_emailAdress +"\r\n").getBytes());
os.write(("Subject: MIAM TEST\r\n").getBytes());
os.write(("TESTMESSAGE FROM MIAM \r\n").getBytes());
os.write(".\r\n".getBytes());
os.write("QUIT\r\n".getBytes());
int c = 0;
// DOESN'T LEAVE LOOP
while ( (c = is.read() ) != -1) {
sb.append( (char)c);
}
System.out.println(sb.toString());
}
catch (Exception e) {
e.printStackTrace();
}
finally {
try {
if(is != null) {
is.close();
}
if(os != null) {
os.close();
}
if(sc != null) {
sc.close();
}
} catch(IOException e) {
e.printStackTrace();
}
}
}
public void getEmail() {
try {
sc = (SocketConnection) Connector.open("socket://" + popServerAdress + ":110");
is = sc.openInputStream();
os = sc.openOutputStream();
sb = new StringBuffer();
int ch = 0;
os.write( ("USER " + userName + "\r\n").getBytes());
os.write( ("PASS " + userPass + "\r\n").getBytes());
os.write( ("LIST" + "\r\n").getBytes());
os.write( ("RETR 1" + "\r\n").getBytes());
os.write("QUIT\r\n".getBytes());
while ( (ch = is.read() ) != -1) {
sb.append( (char) ch);
}
System.out.println(sb.toString());
}
catch (Exception e) {
e.printStackTrace();
}
finally {
try {
if(is != null) {
is.close();
}
if(os != null) {
os.close();
}
if(sc != null) {
sc.close();
}
} catch(IOException e) {
e.printStackTrace();
}
}
}
http://www.experts-exchange.com/Networking/Wireless/Q_21094744.html
does not work. The reason is because you did not wait for server to
reply before sending the next command.
See my later blog for correct version.
public void sendEmail() {
try {
sc = (SocketConnection) Connector.open("socket://"
is = sc.openInputStream();
os = sc.openOutputStream();
sb = new StringBuffer();
// Send SMTP-Commands
os.write(("HELO" + domain + "\r\n").getBytes());
os.write(("MAIL FROM: "+ from_emailAdress +"\r\n").getBytes());
os.write(("RCPT TO: "+ to_emailAdress + "\r\n").getBytes());
os.write("DATA\r\n".getByt
os.write(("Date: " + new Date() + "\r\n").getBytes());
os.write(("From: "+ from_emailAdress +"\r\n").getBytes());
os.write(("To: "+ to_emailAdress +"\r\n").getBytes());
os.write(("Subject: MIAM TEST\r\n").getBytes());
os.write(("TESTMESSAGE FROM MIAM \r\n").getBytes());
os.write(".\r\n".getBytes(
os.write("QUIT\r\n".getByt
int c = 0;
// DOESN'T LEAVE LOOP
while ( (c = is.read() ) != -1) {
sb.append( (char)c);
}
System.out.println(sb.toSt
}
catch (Exception e) {
e.printStackTrace();
}
finally {
try {
if(is != null) {
is.close();
}
if(os != null) {
os.close();
}
if(sc != null) {
sc.close();
}
} catch(IOException e) {
e.printStackTrace();
}
}
}
public void getEmail() {
try {
sc = (SocketConnection) Connector.open("socket://"
is = sc.openInputStream();
os = sc.openOutputStream();
sb = new StringBuffer();
int ch = 0;
os.write( ("USER " + userName + "\r\n").getBytes());
os.write( ("PASS " + userPass + "\r\n").getBytes());
os.write( ("LIST" + "\r\n").getBytes());
os.write( ("RETR 1" + "\r\n").getBytes());
os.write("QUIT\r\n".getByt
while ( (ch = is.read() ) != -1) {
sb.append( (char) ch);
}
System.out.println(sb.toSt
}
catch (Exception e) {
e.printStackTrace();
}
finally {
try {
if(is != null) {
is.close();
}
if(os != null) {
os.close();
}
if(sc != null) {
sc.close();
}
} catch(IOException e) {
e.printStackTrace();
}
}
}
Bluetooth on J2SE
http://bluecove.sourceforge.net/
Quick Tutorials
How to quickly install and test your bluetooth
J2SE capability.
1. Download bluecove-2.1.0.jar from http://code.google.com/p/bluecove/
2. Open Netbeans, goto Libraries Menu and add new library.
Navigate to the bluecone-2.1.0.jar and add it as a jar library.
Do not uncompress it. Call it Bluecove in the textfield descriptor.
3. Create a new Java application project and paste this code in:
/**
* Minimal Device Discovery example.
*
* http://bluecove.sourceforge.net/apidocs/overview-summary.html#DeviceDiscovery
*/
package bluetoothremotedevicediscovery;
import java.io.IOException;
import java.util.Vector;
import javax.bluetooth.*;
public class RemoteDeviceDiscovery {
public static final Vector/**/ devicesDiscovered = new Vector();
public static void main(String[] args) throws IOException, InterruptedException {
final Object inquiryCompletedEvent = new Object();
devicesDiscovered.clear();
DiscoveryListener listener = new DiscoveryListener() {
public void deviceDiscovered(RemoteDevice btDevice, DeviceClass cod) {
System.out.println("Device " + btDevice.getBluetoothAddress() + " found");
devicesDiscovered.addElement(btDevice);
try {
System.out.println(" name " + btDevice.getFriendlyName(false));
} catch (IOException cantGetDeviceName) {
}
}
public void inquiryCompleted(int discType) {
System.out.println("Device Inquiry completed!");
synchronized (inquiryCompletedEvent) {
inquiryCompletedEvent.notifyAll();
}
}
public void serviceSearchCompleted(int transID, int respCode) {
}
public void servicesDiscovered(int transID, ServiceRecord[] servRecord) {
}
};
synchronized (inquiryCompletedEvent) {
boolean started = LocalDevice.getLocalDevice().getDiscoveryAgent().startInquiry(DiscoveryAgent.GIAC, listener);
if (started) {
System.out.println("wait for device inquiry to complete...");
inquiryCompletedEvent.wait();
System.out.println(devicesDiscovered.size() + " device(s) found");
}
}
}
}
4. Edit your Project properties Select the Library and then
select the Compile Tab and click on Add Library. Select the Bluecove
library.
5. Just run it and watch the output window. Make sure your bluetooth
is turned on and also your Mobile phone is turned on. It will be
able to detect your mobile phone.
Bluetooth JSR82 Samples:
http://www.jsr82.com/
Quick Tutorials
How to quickly install and test your bluetooth
J2SE capability.
1. Download bluecove-2.1.0.jar from http://code.google.com/p/bluecove/
2. Open Netbeans, goto Libraries Menu and add new library.
Navigate to the bluecone-2.1.0.jar and add it as a jar library.
Do not uncompress it. Call it Bluecove in the textfield descriptor.
3. Create a new Java application project and paste this code in:
/**
* Minimal Device Discovery example.
*
* http://bluecove.sourceforge.net/apidocs/overview-summary.html#DeviceDiscovery
*/
package bluetoothremotedevicediscovery;
import java.io.IOException;
import java.util.Vector;
import javax.bluetooth.*;
public class RemoteDeviceDiscovery {
public static final Vector/*
public static void main(String[] args) throws IOException, InterruptedException {
final Object inquiryCompletedEvent = new Object();
devicesDiscovered.clear();
DiscoveryListener listener = new DiscoveryListener() {
public void deviceDiscovered(RemoteDevice btDevice, DeviceClass cod) {
System.out.println("Device " + btDevice.getBluetoothAddress() + " found");
devicesDiscovered.addElement(btDevice);
try {
System.out.println(" name " + btDevice.getFriendlyName(false));
} catch (IOException cantGetDeviceName) {
}
}
public void inquiryCompleted(int discType) {
System.out.println("Device Inquiry completed!");
synchronized (inquiryCompletedEvent) {
inquiryCompletedEvent.notifyAll();
}
}
public void serviceSearchCompleted(int transID, int respCode) {
}
public void servicesDiscovered(int transID, ServiceRecord[] servRecord) {
}
};
synchronized (inquiryCompletedEvent) {
boolean started = LocalDevice.getLocalDevice().getDiscoveryAgent().startInquiry(DiscoveryAgent.GIAC, listener);
if (started) {
System.out.println("wait for device inquiry to complete...");
inquiryCompletedEvent.wait();
System.out.println(devicesDiscovered.size() + " device(s) found");
}
}
}
}
4. Edit your Project properties Select the Library and then
select the Compile Tab and click on Add Library. Select the Bluecove
library.
5. Just run it and watch the output window. Make sure your bluetooth
is turned on and also your Mobile phone is turned on. It will be
able to detect your mobile phone.
Bluetooth JSR82 Samples:
http://www.jsr82.com/
How to get IP of your mobile phone
Your mobile handset will be connected to the service provider's NAT gateway. The IP that your mobile handset get is a private IP, means that this IP can't be reached from external world.
There are ways to get both your private IP and the IP Address of the NAT gateway.
Getting your IP Address
1)The following snippet will give you your private IP Address.
ServerSocketConnection scn = (ServerSocketConnection)Connector.open("socket://:1234");
System.out.println(scn.getLocalAddress());
Note: This method may return your IP Address as 127.0.0.1 (the loopback address) if the GPRS link has been idle. So always send some data over the connection before testing this.
2)Using the System properties
System.getProperty("microedition.hostname");
3)This is a bit round about method, but is the most guarenteed to work one. If you are trying to connect to your custom server, have the server tell your ip to you. Implement a handshake protocol, where you say "Hello server" and the server replies "Hello client. Your IP is xx.xx.xx.xx".
Getting the IPAddress of the NAT gateway
Service like http://whatismyipaddress.com/ or http://www.lawrencegoetz.com/programs/ipinfo/ or http://www.whatismyip.com/ gives the IP Address it sees when you browse their pages. This will be your NAT IP Address. Just parse the page and get the IP.
http://www.javameblog.com/2007/12/how-to-get-ip-address-of-mobile-using.html
Determining if a string contains substring
String string = "Madam, I am Adam";

 // Starts with
 boolean  b = string.startsWith("Mad");  // true

 // Ends with
 b = string.endsWith("dam");             // true

 // Anywhere
 b = string.indexOf("I am") > 0;         // true

 // To ignore case, regular expressions must be used

 // Starts with
 b = string.matches("(?i)mad.*");

 // Ends with
 b = string.matches("(?i).*adam");

 // Anywhere

 b = string.matches("(?i).*i am.*");


http://www.exampledepot.com/egs/java.lang/HasSubstr.html
Saturday, January 17, 2009
Netbeans: How to set JFrame Size in Design View

To be able to resize the JFrame in Design View, you need to
change the Form Size Policy to Generate Resize Code.
The default is Generate pack().
You can do that by selecting the Code Generation Property
as shown in the screen shot above.
However, once you do that, you may find that the JInternalFrame
(the MDI Child) may not align properly inside the Parent Frame.
To solve this problem, modify the Parent code:
private void startrevisionMenuItemActionPerformed(java.awt.event.ActionEvent evt) {
StartrevisionFrame startexamframe = new StartrevisionFrame();
desktop.add(startexamframe);
startexamframe.setLocation(0, 0);
startexamframe.setVisible(true);
}
The important method is:
startexamframe.setLocation(0, 0);
Friday, January 16, 2009
Sun Microsystem Malaysia Certification Online Purchase?
From : Sun Microsystem Malaysia:

Can pay by credit card?

Can pay by credit card?

Thursday, January 15, 2009
Saturday, January 10, 2009
Nokia 3120 Classic

RM450 includes 1GB memory card
MIDP2.1
Flash Lite 2.1
Resolution 240 x 320
3G Phone
Camera 2 MP with flash
Bluetooth
Java API:
CLDC 1.1
JSR 135 Mobile Media API
JSR 172 Web Services API
JSR 177 Security and Trust Services API
JSR 184 Mobile 3D Graphics API
JSR 205 Wireless Messaging API
JSR 211 Content Handler API
JSR 226 Scalable 2D Vector Graphics API
JSR 234 Advanced Multimedia Supplements
JSR 248 Mobile Service Architecture for CLDC
JSR 75 FileConnection and PIM API
JSR 82 Bluetooth API
MIDP 2.1
Nokia UI API
So far, the lowest priced phone with all the essential features!
Sun Java Training in Malaysia
| Course description (CX-310-065) |
Sun Certified Programmer for the Java Platform, Standard Edition 6 (CX-310-065) |
Details
- Delivered at: Authorized Worldwide Prometric Testing Centers
- Prerequisites: None
- Other exams/assignments required for this certification: None
- Exam type: Multiple choice and drag and drop
- Number of questions: 72
- Pass score: 65% (47 of 72 questions)
- Time limit: 210 minutes
A lowyat blogger passes
Friday, January 9, 2009
SCJP and SCMAD


Prometric Exam Centers:
MCSB SYSTEM (PG) SDN BHD
PENANG 10470
Phone: 899 1900 Site Code: ML3
ISLAND PLAZA
118 JALAN TANJUNG TOKONG
| PLATRONIX SDN BHD | Suite 15A-15D, Northam House |
Thursday, January 8, 2009
Sony Ericsson Z610i MIDP and JSR

Screen Sizes
176x220
JSR
- CLDC 1.1
- WMA (JSR-120)
- MMAPI(JSR-135)
- Webservices (JSR-172)
- Mobile 3D(JSR-184)
- Java Technology for the Wireless Industry(JSR-185)
- WMA 2.0(JSR-205)
- AMS Camera Capabilities only(JSR-234)
- File/PIM(JSR-75)
- Bluetooth(JSR-82)
- Mascot Capsule V3
- Nokia UI API 1.1
Motorazr MIDP and CLDC version

MIDP 2.0
CLDC 1.0 not CLDC 1.1
| Display |
| Resolution: 176x220 |
| J2ME |
| CLDC version: 1.0 |
| MIDP version: 1.0 MIDP version: 2.0 |
| Heap Size (Bytes): 819200 |
| Jar Size (Bytes): 102400 |
| RMS Store Size (Bytes): 5242880 |
| Specific JSR: JSR-82 ( Bluetooth ) Specific JSR: JSR-120 ( Wireless Messaging API ) Specific JSR: JSR-135 ( Mobile Media API ) |
From stats.getjar.com
Motorola Razr's Specs
Motorola mobile phone models
Friday, January 2, 2009
Full Screen Mode
Full screen mode is now possible with:
public void startApp() {
if (canvas == null) {
canvas = new practiceCanvas(Display.getDisplay(this));
Command exitCommand = new Command("Exit", Command.EXIT, 0);
canvas.addCommand(exitCommand);
canvas.setFullScreenMode(true);
canvas.setCommandListener(this);
}
// Start up the canvas
canvas.start();
}
However, the older deprecated Nokia UI is available for
download here:
Nokia UI, API
But it is not necessary. Previously to get full screen,
you need to do this:
import javax.microedition.lcdui.*;
import javax.microedition.lcdui.game.*;
import java.util.*;
import java.io.*;
import com.nokia.mid.ui.*;
public class practiceCanvas extends FullCanvas implements Runnable{
Now, with MIDP2, no need to extend Nokia's FullCanvas class,
to get fullscreen just set:
canvas.setFullScreenMode(true);
This works for SonyEricsson as well as Nokia.
However, in Nokia, you may need to press keypad 5 for
the fire button, instead of the usual controller center
key
Device Control
However it is a good idea to take a look at the
deprecated Nokia UI to see what device control is available
as replaced by MIDP2, eg,
com.nokia.mid.ui Class DeviceControl
enables vibration, etc...
display.vibrate(int frequency)
frequency is from 1 to 100
Others:
javax.microedition.lcdui.Display.flashBacklight(int).
However, note that when you do:
AlertType.INFO.playSound(display);
the mobile phone may also vibrate. As such it
may be redundant to call display.vibrate();
Note that other S40_6th_Edition_SDK contains other
API specific to Nokia only. If you choose to implement them,
then the program is limited to Nokia.
public void startApp() {
if (canvas == null) {
canvas = new practiceCanvas(Display.getDisplay(this));
Command exitCommand = new Command("Exit", Command.EXIT, 0);
canvas.addCommand(exitCommand);
canvas.setFullScreenMode(true);
canvas.setCommandListener(this);
}
// Start up the canvas
canvas.start();
}
However, the older deprecated Nokia UI is available for
download here:
Nokia UI, API
But it is not necessary. Previously to get full screen,
you need to do this:
import javax.microedition.lcdui.*;
import javax.microedition.lcdui.game.*;
import java.util.*;
import java.io.*;
import com.nokia.mid.ui.*;
public class practiceCanvas extends FullCanvas implements Runnable{
Now, with MIDP2, no need to extend Nokia's FullCanvas class,
to get fullscreen just set:
canvas.setFullScreenMode(true);
This works for SonyEricsson as well as Nokia.
However, in Nokia, you may need to press keypad 5 for
the fire button, instead of the usual controller center
key
Device Control
However it is a good idea to take a look at the
deprecated Nokia UI to see what device control is available
as replaced by MIDP2, eg,
com.nokia.mid.ui Class DeviceControl
enables vibration, etc...display.vibrate(int frequency)
frequency is from 1 to 100
Others:
javax.microedition.lcdui.Display.flashBacklight(int).
However, note that when you do:
AlertType.INFO.playSound(display);
the mobile phone may also vibrate. As such it
may be redundant to call display.vibrate();
Note that other S40_6th_Edition_SDK contains other
API specific to Nokia only. If you choose to implement them,
then the program is limited to Nokia.
Thursday, January 1, 2009
Nokia 7210 Supernova

Device Description:
The Nokia 7210 Supernova is a monoblock device,supporting GSM 900/1800/1900. It is an affordable good
design phone featuring a 2 megapixel camera, Music Player,
USB 2.0 Full Speed, Bluetooth 2.0, Flash Lite 3.0 and
MIDP Java 2.1 with additional Java APIs.
CLDC 1.1
JSR 135 Mobile Media API
JSR 172 Web Services API
JSR 177 Security and Trust Services API
JSR 184 Mobile 3D Graphics API
JSR 205 Wireless Messaging API
JSR 211 Content Handler API
JSR 226 Scalable 2D Vector Graphics API
JSR 234 Advanced Multimedia Supplements
JSR 248 Mobile Service Architecture for CLDC
JSR 75 FileConnection and PIM API
JSR 82 Bluetooth API
MIDP 2.1
Nokia UI API
Nokia Specifications
How to create transparent background Sprites
1. Assuming you have the following sprite grid file:
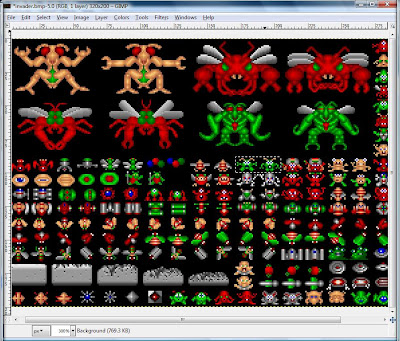
and you wish to create a frame sprite out of the two alien in the center
marked by the rectangle.
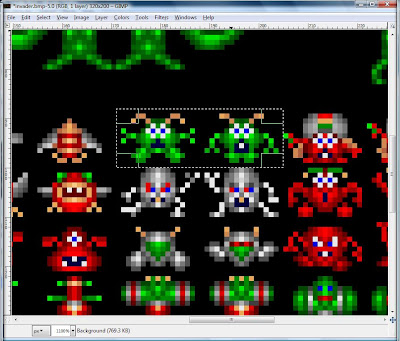
2. Open up Gimp and select it with the rectangle select tool as
shown below:
3. Copy the selection and paste it into another new canvas:
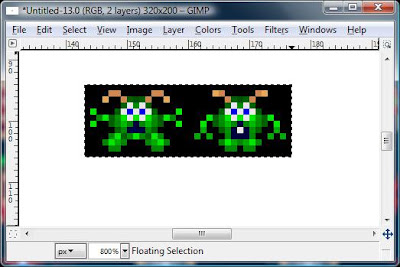
Note that the canvas is larger than the selection that has just
been pasted into it.
4. To reduce the canvas size until it fits the image, select
Image / AutoCrop Image and you will get this:
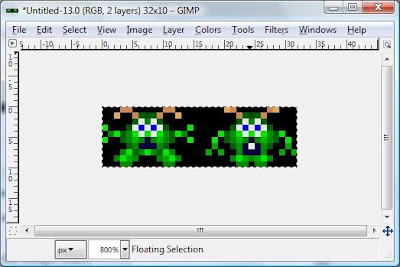
5. The next step is to remove the black background, so that
the background is transparent. To do this, you need to merge
the layers so that there is only one layer. Only then can you
select the black background and cut it out. Select Merge Visible
Layers. Then select the black background using Select / By Color
and you should get this:

6. Then simply cut out the selected black background and
you will get this:

The background is now transparent. You can now, create
a sprite out of it. You will need to get the Pixel Dimension.
Select Image / Image Properties to see it:

Note that the Pixel Dimension is 32 x 10.
As such, each sprite frame size should be 16 x 10.
Do this:
alienSprite=new Sprite(Image.createImage("/images/alien.png"),16,10);
Note that you can also find out the Pixell Dimension by hovering
the cursor over the image and watching the px values on the
bottom left of the window.

and you wish to create a frame sprite out of the two alien in the center
marked by the rectangle.
2. Open up Gimp and select it with the rectangle select tool as
shown below:

3. Copy the selection and paste it into another new canvas:

Note that the canvas is larger than the selection that has just
been pasted into it.
4. To reduce the canvas size until it fits the image, select
Image / AutoCrop Image and you will get this:

5. The next step is to remove the black background, so that
the background is transparent. To do this, you need to merge
the layers so that there is only one layer. Only then can you
select the black background and cut it out. Select Merge Visible
Layers. Then select the black background using Select / By Color
and you should get this:

6. Then simply cut out the selected black background and
you will get this:

The background is now transparent. You can now, create
a sprite out of it. You will need to get the Pixel Dimension.
Select Image / Image Properties to see it:

Note that the Pixel Dimension is 32 x 10.
As such, each sprite frame size should be 16 x 10.
Do this:
alienSprite=new Sprite(Image.createImage("/images/alien.png"),16,10);
Note that you can also find out the Pixell Dimension by hovering
the cursor over the image and watching the px values on the
bottom left of the window.
Subscribe to:
Posts (Atom)